Thursday, March 12, 2015

Bedroom Cabinet Doors

This past weekend we were able to get the cabinet doors finished and put in place.  We seem to always have a few small things left to finish on areas we consider done for the most part.  I'm sure a lot of builds are like this.  You are eager to move on to the next step and think, "Oh, that can be done later".  When you finally do finally finish the little things, it feels amazing!  Getting the doors done was like that for me. 


Grooves cut into the trim boards to accept the plywood panels and to join the ends together.  All this was done with the table saw. 


Checking the joint fit.  So far so good.


Gluing the sections together. 


Clamping the doors together to let the glue set and keep all the joints nice and tight. 


We used the same stain we used on the bed and the cabinets.  We also used the same wood, poplar on the trim boards so the stain would match.  Ronnie applying the polyurethane sealant.


Sitting out in the little sun we got to dry.  Looking good! 


We attached the doors to the clothing cabinets with hinges.  They close well and we used some little rubber bumper dots to keep them from slamming against the wood.  Allows them to shut pretty quiet as well. 


For the bigger doors that cover the utility closet, we did something a little different.  We wanted to be able to completely remove the doors to do maintenance and work in the small cabinet, so we created some metal brackets that slide into place and hold the doors on. 


Here is a drawing of the brackets we made. 


We bought some flat steel pieces.  Ronnie measuring a bracket.


Cutting the piece to size.


Bending the bracket.  We clamped it off at the edge of where the bend needs to be then hammered it over.


Only 7 more to go!  Once we got them all bent we used grinder to smooth the edges.  We then drilled out the screw holes needed.


And here's the brackets in place. 


You slide the top brackets in place and then pull downward to fit the bottom ones over the bottom lip of the cabinet. 


There they are, in place.  They fit nice and snug.  No rattle! 


And there we have it.  Cabinet doors are done and the bedroom area woodwork is done!  Finally!  And I love it!  I think the Hubby did a fantastic job building the doors.  I love the 3 panel door design so much better than typical cabinet doors.  :) 


 We have started sleeping in the tiny house when we work on it.  Since the bedroom area is done and we have our new mattress in place, why not?  We had been staying in the guest quarters at our friends place, where Tiny is parked but they have a guest for a few months staying there.  We don't have the plumbing done just yet so we have to make the walk up to the main house to shower and such.  I spent my first night in the house Saturday after we worked all day and boy did that bed sleep good! 


Good morning!
Looking out the window while sitting in bed. 


Our bedroom fans.  They are pretty quiet and we can control the speeds which is nice.  They cover the bed area really well.  Should work wonderfully in the summer. 


Now all we need is a coffee pot in here so I can roll out of bed and grab a cup! 


So, that's what we have been up to.  We will be moving on to the rest of the kitchen build soon.  Getting our plan together.  We ordered our stove and small washing machine and are waiting on them to come in.  It seems that everything is falling into place slowly and I love how things are turning out.  We have some neat ideas for things to come and are eager to see how they work out.  Thanks for reading and please leave us some comments, let us know what you think!  :)


Tuesday, March 10, 2015

Kitchen Cabinet Work Has Begun!

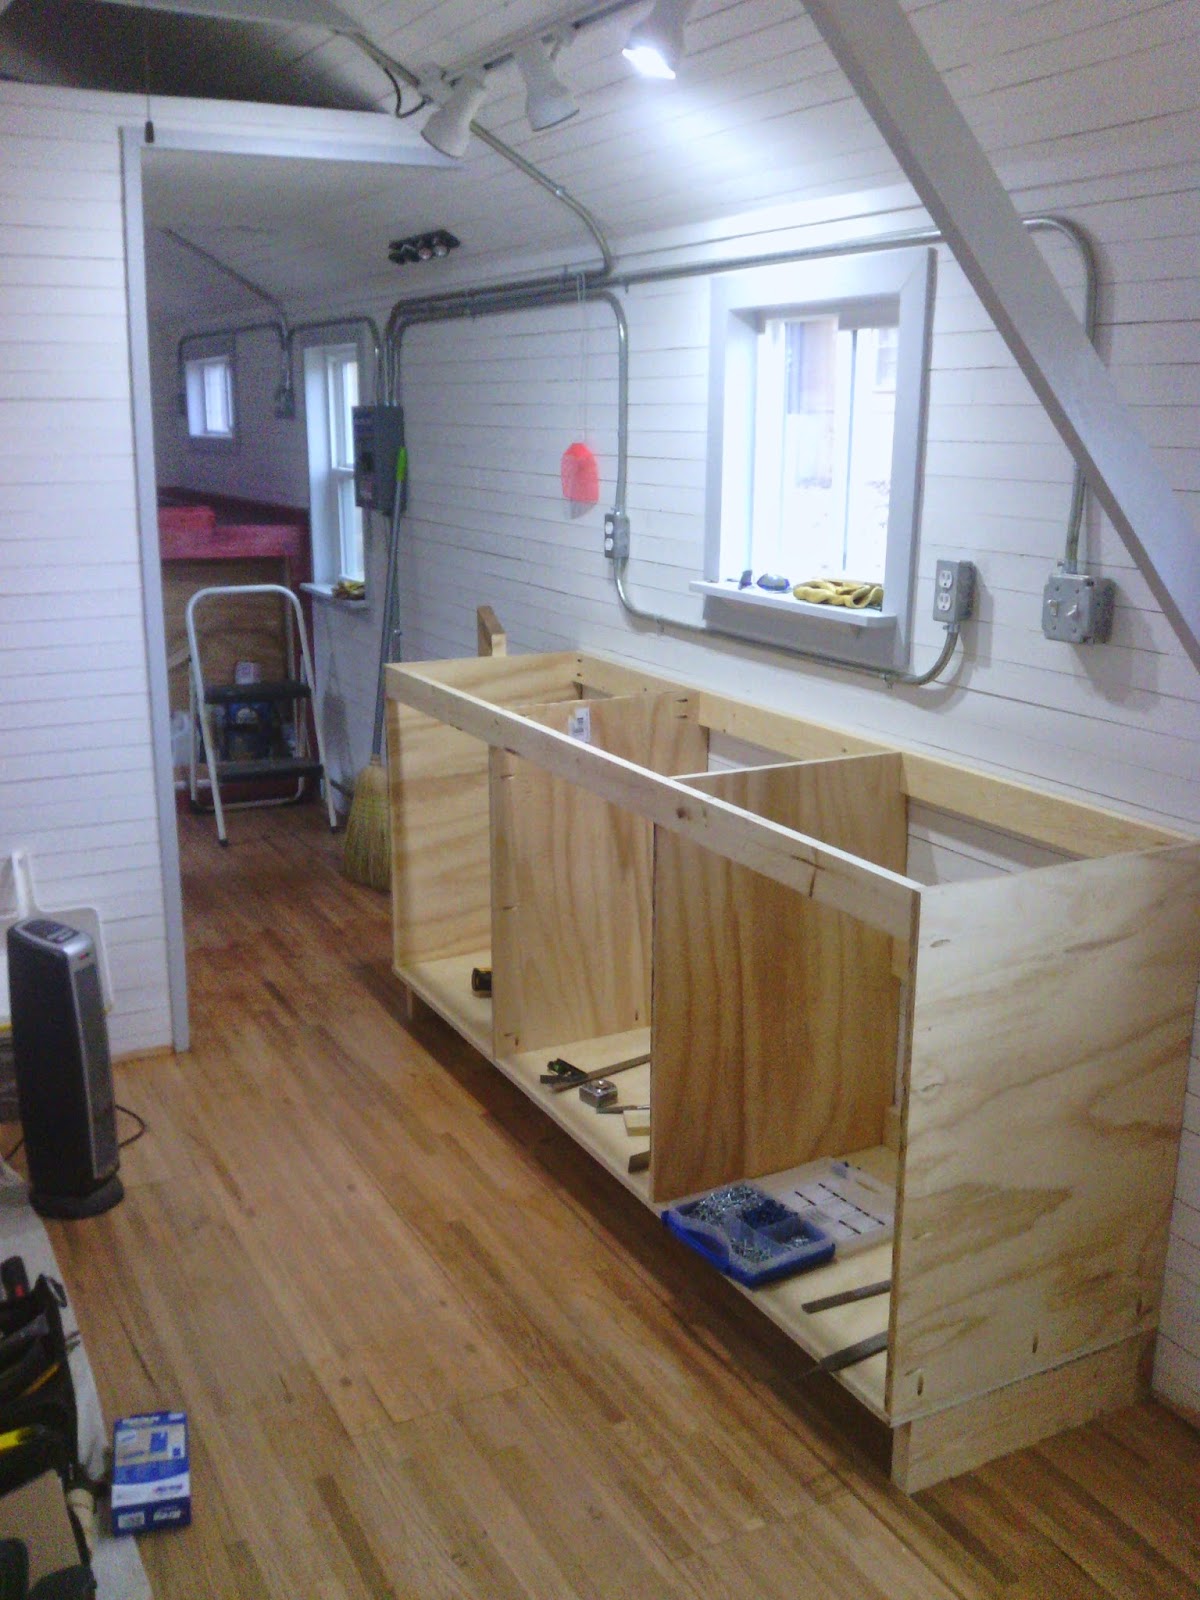
I am so excited to say that we have started work on the kitchen!  I have been looking forward to this part for a while now!  To see how the kitchen would come together.  Looking at it on paper and imagining it in your head just doesn't give you a true feel of the space.  I can't wait to see it completely finished!

The weather has been rather mental here.  Rain several days then freezing temps and the threat of ice.  Then up in the low 60's the next day!  We were able to get the sink cabinet build, minus the doors but it seems like a huge accomplishment. 

We built our cabinets a bit narrower and taller than normal.  They are 38 inches tall and 21 inches wide. We both hate how short normal counters are so we made ours to fit us. :-)

Here's what the space looked like before we built the cabinet.  
  Lining everything up.  Trying to get it all square.

We used cabinet grade plywood 1/2inch thick.  We used the Kreg Jig to hide all the screw holes we could.  The main ones are inside the center cabinet under the sink.  


Cabinet in place and screwed down.  We also used wood glue on all the pieces.  As we say, it's glued and screwed!


Me painting the inside.  Went with a hi-gloss white for easy cleaning and reflecting light. 

This color scheme is one of my favorites.  I fell in love with these vintage kitchen utensils as a child and the colors have been my favorite choice for a kitchen since.  I was just glad that the Hubby liked the colors as much as I did. The cabinets will be done in the creamy yellow color with the door trim in the green. 


Me painting the outside. 
 
 Laying the tiles out to get them evenly spaced.  We used tile board underneath and for the backsplash.  We are using 4 inch white tiles for a classic look.  The edge pieces are slightly raised to keep water from running off the edge of the counter. 

Setting the tiles in mastic.  


Tiles grouted.

And there she is.  Sink and faucet in place!  We got our sink from Ikea for $80.00 and the faucet was $88.00 from Home Depot.  It's made by Glacier Bay.  It has the pull down sprayer and is really nice. Most of the faucets we looked at ran from $150 and up.  I was extremely happy to find one I liked under $100! 

So, there you have it.  One side built.  We will be making the doors very soon.  Then, on to building the other counter that will go between the fridge and the stove. 

Wednesday, February 18, 2015

Bedroom Part 2. The Finishing Touches.

We spent Valentines weekend finishing up the bedroom area.  We got everything we wanted done and still had time to enjoy a nice meal out with friends. 


We left the bedroom slightly unfinished in the last post.  We had the cabinets built but not faced.  We also had to finish the baseboards on the bed area.  It was still pretty ugly looking. 


We bought some nice poplar boards to make the facing out of.  We got all the measurements and cut the boards.  We then used the Kreg Jig to drill the holes on the backside, so you wouldn't see them when assembled. 


Here it is mostly assembled.  We wanted to see if it would make the turn from the hallway into the bedroom.  Of course it wouldn't.  That means we'd have to assemble it in place.  Kind of a pain, since the screws are on the backside and the area was tight! 


We took it back apart to stain it.  We stained the baseboards also.  We used the same cabernet color stain we used on the rest of the bedroom.  The baseboards are made out of pine framing lumber, just like the bed frame. You can see the poplar is streaked with green in the grain.  This had a neat effect on the stain. 


The grain really pops out on this wood.  The green shows through in places, making me think of rhubarb stalks!  I loved how it turned out.


Here it is, installed and screwed down tight.  This side is for clothes. 


This side is our utility area.  This will house our water tank, pump  and the filter system.  We plan to build doors for both sides but that can be done at a later date.


Ronnie applying the polyurethane sealer over the stain.  


Baseboards in place! 


There it is...our bedroom.  We are really happy with how it turned out!  We do plan on making doors for the cabinets but that will come later.   We'll be sure to use more poplar for them, to get that rhubarb color to match!  I love how that wood took the stain!  

Now, on to the kitchen!  YAY!  :D


What Says "I Love You" Better Than an Appliance??

We all want that special someone to buy us something wonderful on Valentines Day.  It makes us feel special and loved, right?  Well, all I wanted for Valentines Day this year was my new fridge for the tiny house.  And guess what??  I got it!  :)


It's a Vissani 10.5 cubic ft, stands about about about 5 foot tall. 

Most of the tiny fridges you see have the old wire shelves inside, which I hate.  Things tend to tip and spill easy if not placed just right.  I wanted glass shelves.  Also, most fridges seemed to have the wire soda can holder in the door and the other door compartments are not adjustable.  We don't drink sodas so that was a waste of space to me.  And I want to be able to customize my door to hold what I want.  This fridge has adjustable pockets and the "can" spaces can be used for other things, like butter and such.  It has two crisper drawers and plenty of space. It also has an actual freezer, not one of those little slots to put frozen stuff.  You know the ones I mean....they always get frosted up real bad and never fit more than a few frozen dinners. 


I have been eying this little fridge every time we went to Home Depot.  Counting down the days when we'd be close enough to the kitchen build to actually buy it.  Finally, the time has come!  And what better gift on Valentines Day??  I mean, love radiates from the kitchen.  It's where you cook your family food that sustains them. And we have all been told that old saying..."The way to anyone's heart is through their stomach".  Your fridge holds most of those ingredients to make those wonderful meals.  :)  I can't wait to see it full of food!


Friday, February 13, 2015

Floor Finishing 101

We love our oak floor.  It was a pain to put down.  Heavy!  We waited to finish it until a majority of the work was done inside.  We didn't want to mess it up moving things around and stacking wood everywhere.  But the time has come to get it done.  We wanted it finished and sealed before we build our kitchen cabinets and moved the appliances in.  We bought a small belt sander from Harbor Freight and picked out our stain.  We went with a traditional color called Golden Pecan.  It looked great on the oak sample we saw.  So here's what we did and how it turned out!


As you can see, the floor got pretty dirty and a little stained with all the work we have been doing.  It was ready for some TLC!


We originally planned to leave the screws visible and fill them in with the floor sealer but decided it didn't look right. 
You can see the staining from moisture and dirt pretty well in this picture. 


Hubby built a homemade countersink stop for his drill.  We wanted the screws all countersunk at the same distance. 


Screws countersunk and in place.


We plugged the holes with a dowel rod.  We glued it in place.


We trimmed it flush with the floor.


We filed it smooth.  One down, now on to the hundred or so more screws we have to fill!


It's slow work but it's getting there!


Sanding the floors took some elbow grease.  Since a lot of the areas were tight, we used a small belt sander.  That meant the Hubby was crawling around on his knees to do the sanding.  It had to be done several times.  This is with a course grit sand paper to get a majority of the stains and dirt up. 


It had to be sanded again with a fine grit sandpaper to smooth it out completely before we could stain.  All that sanding covered everything in dust.  We used the air compressor to blow off the walls and such and then vacuumed several times to get all the dust up.  Did I mention it was DUSTY!?!


We wiped the floor completely with acetone to remove any lingering dust before we stained.  We applied the stain in small sections with a foam roller and let it sit a few minutes before wiping it off with a clean rag.  So far it looks great!


Stain completely rolled on and drying.  It turned out a little splotchy but we thought it would even out with the sealer.


We used Parks Pro Water based Polyurethane to seal the floors.  It looked like milk being spread on the floors.  As you can see, Hubby made his own protective booties out of plastic shopping bags to keep dirt off the floor.   


There it is...floor finished!  It didn't turn out as perfectly as we hoped.  It was still splotchy and unevenly stained in areas.  But it's done!  We are not beating ourselves up too badly since this was the first time we had done a staining job this big.  It shows character I think.  It shows we did it ourselves! And yes, I love my imperfect floor!


We have to be sure and put down protective covering when we lay anything on the floor now.  We bought some painters traps and packing blankets to use when we work inside. 


So, there you have it.  We now have finished floors and can move on to other things!  We will be finishing up the small details in the bedroom and then on to the kitchen!  Oh boy!  We are pretty excited to get to this stage!  I just love seeing my house come together bit by bit.  :)