I really wanted a headboard to make the bed look like an actual bed, not just a mattress on the floor. We looked at a few styles and we both liked the look of the tufted headboards. After watching a few YouTube videos, we found one that had the best instructions for doing your own. I'll be sure to link it at the end of the post.
We used a piece of 1/2 inch plywood as the backer. We figured out how the diamonds would lay and marked the rows.
Drill the holes where the buttons would be. It doesn't need to be a large hole. Just big enough to pass the upholstery needle through.
Use spray adhesive to put the 2 inch thick foam down on the plywood. We marked our holes on top by poking the needle up through foam from the bottom and marked it with a marker.
We used a 1 1/4 inch hole saw and drilled out each spot in the foam where the buttons will sit. This hole does NOT go through the plywood.
On the holes along the edges, cut a straight line through the foam. This is done all along the headboard.
Lay down a layer of quilt batting on top of the foam. Cut a small slit in each of the holes and the lines along the edges. Turn your fabric over and mark the center. This is the first button you will add.
Most people use the buttons that you can add fabric to but those were a bit expensive when we figured out how many buttons we would need (37). I found these cute coconut carved buttons that came in a 10 count pack for $3.00. Way cheaper...and they matched our material very nicely.
Make sure you get a heavy duty string for pulling the buttons tight. We bought some string we thought would be strong enough but had a few snap under the pressure. I ended up having to double up the string on each button.
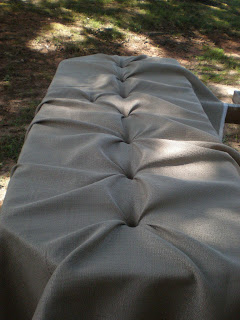
To attach your first button, find the first hole in the foam and use your needle to pull the button through to from top to bottom. Pull the button as tight as you can and staple the string to the back of the plywood. We used a zigzag pattern to staple the string securely. You can see the beginnings of pleats here.
Work one row at a time. Pull all your buttons in that row through but do not staple them just yet. Once you have them all in place. Start in the center and work outward. Staple one at a time so you can shape the pleats. Make sure the pleated lines are facing downward so dust doesn't collect inside them.
Once all the buttons are attached, start working the fabric down into the edge cuts.
I went a step further and tied knots in all my strings at the last staple. Just to bed sure it wouldn't pull through at a later date. Trim all your string ends.
Pull your fabric tight around the edges. Align your pleats along the edge so they are flat and neat. Staple the material tight to the back as you go. Work one edge completely before moving to the next. Trim any excess material or just staple it securely. Most people put a fabric backing over this when they finish. Since ours is going to be mounted to the wall, I didn't bother.
And here's the finished project! I was extremely happy with how it turned out. We made some simple metal brackets to mount it to the wall. Just strips of flat metal with screw holes drilled into them. I forgot to get pictures! We wanted to hide the brackets behind the headboard so we figured out where we wanted it to sit. Measured our brackets and screwed the top ones loosely to the head board. We then figured out how far the headboard pivoted up when we swing it upwards on the brackets. We measured that distance down and screwed the top brackets loosely to the wall. Once it was in the proper place, we screwed the lower brackets tight to the wall. These are hidden behind the bed so you can't see them. Kinda confusing I know...sorry.
Tada! Headboard in place. The tan material goes well with the red stain of the wood in the bedroom. I really like that the buttons are not the same as the material as well. It makes them stand out more.
All in all, we spent about $120.00 to make this headboard. We have a lot of the plywood left over for another project as well. Now, I need to make some curtains that will go well with the headboard!
Here is the YouTube video we used just in case my instructions are confusing. :)
Tufted Headboard DIY Video
Thanks for reading and please let us know what you think. :)


7 comments:
Seriously!
You and that guy inthe picture are putting the rest of us to shame! THAT came out awesome you guys! !
Keep it up! I'm putting up the pine boards inside now.
Thanks Alan. We are pretty pleased with how it turned out. :)
I can't wait to see how your house turns out. Are you going to leave the wood bare? Or paint?
That looks fantastic!!!
Wonderful Job!!!!
Thank you Jordan and Mel. I'm really loving it. And it also provides a nice padded back rest when sitting up in bed. :)
This time I let Chrissy do most of the work. He he! It was nice having lots of help on this project!
The guy
Hello Chrissy, I am miko and I have been doing research for the last 8 months on tiny living and I am ready to make that move .. I have some questions for you if you don't mind.
Post a Comment